 Loading... Please wait...
Our Newsletter
- Home
- Helpful Manuals
Helpful Manuals
How do I replace the ink cartridges?
Make sure you have your replacement cartridges handy before you begin. You must install new cartridges immediately after removing the old ones.
Caution:
Leave your old cartridges in the printer until you are ready to replace them to prevent the print head nozzles from drying out. Do not open ink cartridge packages until you are ready to install the ink. Cartridges are vacuum packed to maintain reliability.
- Turn on your product.
- If an ink cartridge is expended, you see a message on the LCD screen. Note which cartridges need to be replaced, select How-to, and follow the instructions on the screen.
- If you are replacing a cartridge before you see a message on the LCD screen, press the
 home button and select Settings > Maintenance > Ink Cartridge(s) Replacement > Start.
- Lift up the scanner unit.

Caution:
Do not touch the flat white cable inside the printer. Do not lift the scanner unit while the document cover is open. - Open the cartridge cover.

Note: Dispose of used cartridges carefully. Do not take the used cartridge apart or try to refill it.
Warning: If ink gets on your skin, wash it thoroughly with soap and water. If ink gets into your eyes, flush them immediately with water. If ink gets into your mouth, spit it out and see a doctor right away. Keep ink cartridges out of the reach of children.
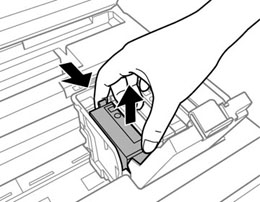
- Squeeze the tab on the cartridge and lift the cartridge straight up to remove it.
- Gently shake the new cartridge four or five times as shown. Then remove the cartridge from the package.

Caution:
Do not remove any labels or seals, or ink will leak. Do not touch the green chip on the cartridge. Install the new cartridge immediately after removing the old one; if you do not, the print head may dry out and be unable to print. - Remove only the yellow tape.

- Insert the new cartridge into the holder and push it down until it clicks into place.

- Close the cartridge cover and push it down until it clicks into place.

- Lower the scanner unit.
Caution:
The product starts charging the ink. This takes a few minutes. When you see a completion message on the LCD screen, ink replacement is complete.
If you see a message that an ink cartridge is installed incorrectly, lift up the scanner unit, open the cartridge cover, and press the ink cartridge down until it clicks into place. Then close the cartridge cover.
Note: Do not turn off the product while charging or you will waste ink.
Caution:
If you remove an ink cartridge for later use, protect the ink supply area from dirt and dust and store it in the same environment as the printer. The valve in the ink supply port is designed to contain any excess ink, but do not touch the ink supply port or surrounding area. Always store ink cartridges with the label facing up; do not store cartridges upside-down.
